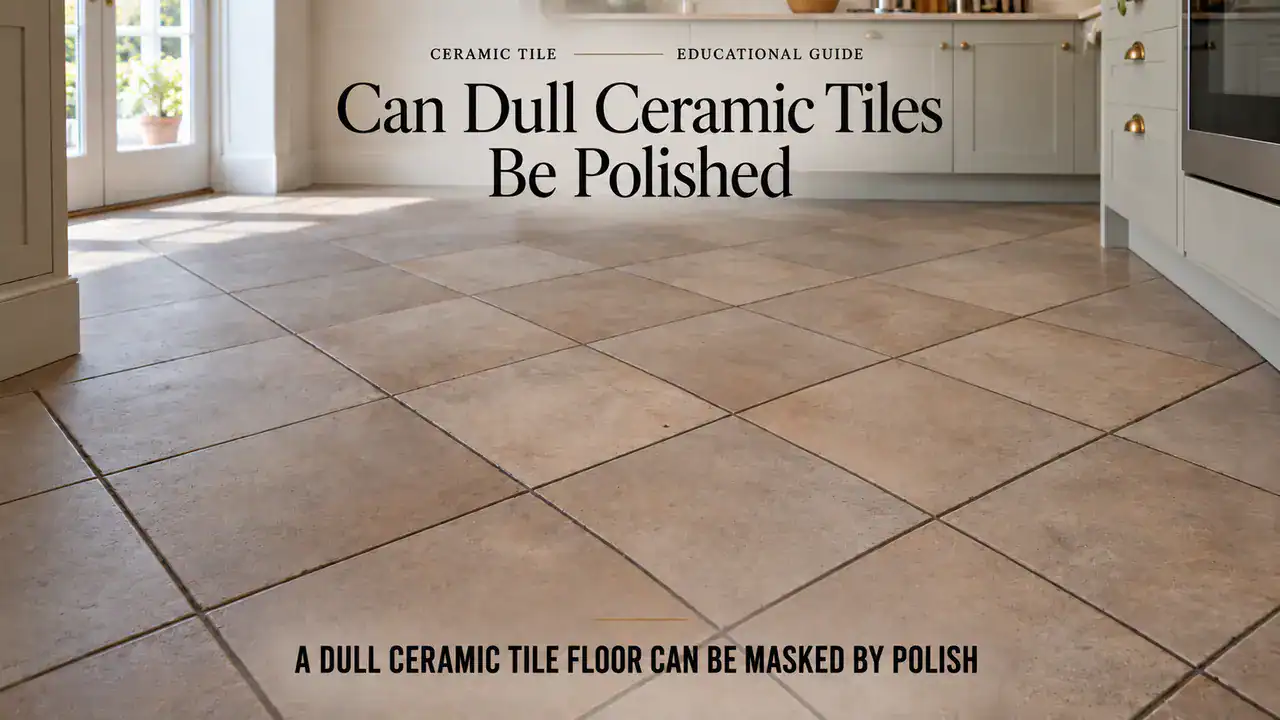
Can My Dull Ceramic Tile Floor Be Polished
Last Updated on October 2, 2026 by David
Usually, a dull glazed ceramic floor needs residue removal or grout improvement rather than abrasive refinishing, because the factory-fired surface is already the tile’s intended finish. The key is telling the difference between a masked glaze, a matt or textured finish, soiled grout and genuine glaze damage before an irreversible polishing mistake is made.
Can Factory-Glazed Ceramic Tile Be Polished? Classifying Surface Problem Severity
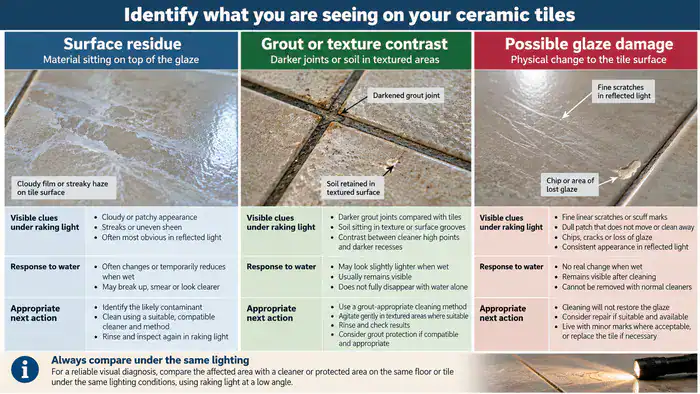
If your ceramic tile shows a dull, altered-looking patch, compare it with an undisturbed area under the same lighting before assuming the finish has been honed or damaged. If the patch changes with viewing angle, moisture level or light, it may be surface residue or an issue with grout appearance rather than a failed tile face. The visible issue needs to be classified before anyone calls it ceramic tile honing.
A genuinely damaged finish tends to show a fixed change in the tile’s appearance, not a removable film. Breached glaze may leave a scratch, chip or rough mark that remains after suitable cleaning, whilst an exposed porous tile body can attract dirt more readily than the surrounding vitreous face. That raises the severity assessment because the original protective surface is no longer continuous.
Glaze crazing failure has its own recognisable pattern: a network of fine hairline cracks across the decorative surface. Homeowners may notice dark lines, uneven colour or repeated staining along those cracks, particularly on older tiles or in damp UK bathrooms. Unlike ordinary dullness, the lines follow a fixed network rather than appearing as a general film across the surface.
Water ingress through damaged glaze becomes relevant when a chip or scratch reaches the body beneath. The area may darken after washing, hold moisture for longer, or stain around the break, whereas an intact glazed face normally resists absorption. Assessment therefore separates a change within the tile from one sitting on top of it.
These distinctions keep ceramic tile restoration within realistic limits. Residue, grout staining and surface dirt can alter appearance without changing the tile itself. A useful explanation of the boundary between recoverable appearance and damaged ceramic is available in what ceramic tile restoration can and cannot restore, helping to prevent a cosmetic concern being mistaken for a honing requirement.
Why Polishing Will Not Revive the Glaze: Ceramic Tile Material Origin, Manufacture and Internal Structure
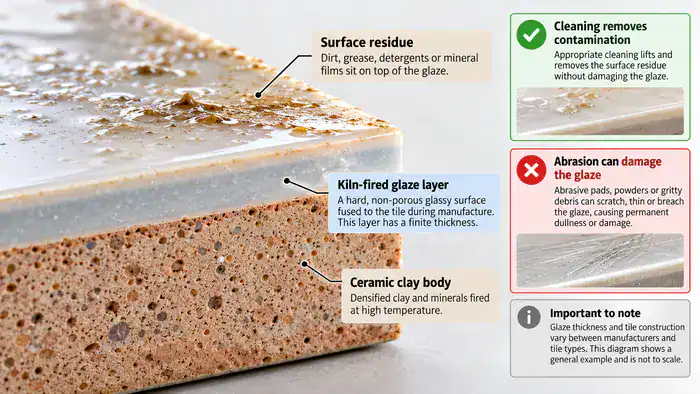
If your ceramic floor looks dull, worn or marked, polishing is unlikely to restore its original shine. Looking across a textured ceramic tile from a low angle makes it clear why that manufactured surface cannot simply be recreated by honing. The kiln-fired clay body sits beneath a finite factory glaze: the body starts with clay and mineral ingredients shaped under pressure, then firing hardens the structure before the protective glaze receives its final kiln treatment. The result is a durable, easy-clean face, not a surface intended for later polishing.
The factory glaze is a vitreous, non-porous and permanent finish carrying the tile’s colour, pattern and intended sheen. Ceramic tile polishing compound cannot reproduce that fused layer once abrasion cuts through it, because polishing changes the surface physically whilst manufacture created it through heat and material fusion. Cleaning may uncover the existing glaze, but abrasive honing cannot rebuild its original safe-cleanability characteristics.
Diamond polishing pads create the same problem by a different route. Coarse pads remove material; fine pads may produce a temporary glossy appearance through buffing or residue transfer. Neither recreates the kiln-fired surface. Excessive pressure can leave scratches, expose the body beneath the glaze and make future cleaning more difficult, especially on dark or glossy tiles.
Textured and anti-slip finishes need particular care because their grooves contribute to slip rating performance in UK wet rooms. Abrasion can soften or alter those micro-features, whilst trapped residue can reduce grip without changing the tile itself. A safe-cleanability assessment asks whether cleaning can reveal the existing finish, not whether honing can manufacture a new one.
Why Residue Can Look Like a Worn Finish—and How Surface Structure, Micro-Features, Dirt Behaviour and Grout Appearance Affect It
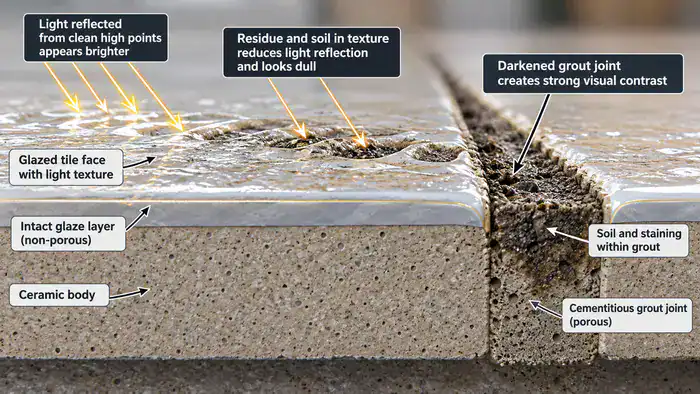
Treating a dull-looking ceramic floor as worn tile can easily draw attention away from the grout and textured areas. A clean-looking tile face beside dark joints often points to an installation-wide appearance issue rather than failed glaze, particularly where strong detergents, hard water or incomplete post-installation cleaning have left residue behind.
Textured tile grooves hold fine soil in recesses that ordinary mopping may simply wet and redistribute. Matt ceramic can show dust marks, water spots and cleaning-product film more readily than a smooth glossy surface, whilst anti-slip finishes can retain foot-traffic soil around raised and recessed features. Uneven light across contaminated texture can look remarkably like a worn finish.
Cementitious grout porosity creates a separate route for soiling. Porous grout contains capillary voids within its cementitious structure, allowing cooking grease, body oils, mineral films and dirty mop water to enter the joint and cause soil absorption. Darkened grout can frame every tile with a dull border, creating aesthetic failure even where the adjacent ceramic face remains intact.
Metal residue transfer is usually more localised. Soft metal from furniture feet, aluminium contact or cleaning equipment can leave a dark scuff line on the glaze; it is a mechanical deposit sitting above the tile rather than a scratch, particularly where the mark has a zero groove and does not catch a fingernail. Non-abrasive removal protects an intact face far better than aggressive buffing.
Genuine defects remain fixed after residue and grout conditions change, whereas embedded soil follows grooves, joints or contact paths. For a fuller explanation, homeowners can read why ceramic tile floors still look dull after cleaning before assuming ceramic tile honing will improve the result.
What to Try Before Using Abrasives—and How Cleaning Mechanisms and Long-Term Maintenance Work
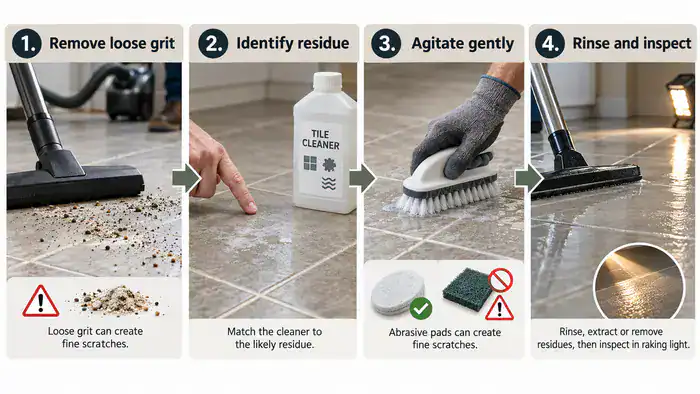
If your ceramic tiles look streaky, dull or lightly scratched after cleaning, check the tile at a low angle for fine linear marks before considering any abrasive treatment. Abrasive grit contamination becomes a surface risk when loose particles remain underfoot or beneath cleaning equipment. Small particles, sand and crumbs can act like sandpaper between a mop head and the glaze, creating fine scratches when the intention was only to remove soil.
Cleaning choices should distinguish between removable soil, residue, transfer and an altered glaze. A vacuum or careful sweep removes loose dust before wet cleaning, whilst a pH-neutral cleaner with mild surfactants supports residue-free routine maintenance without etching or weakening grout. Soft-bristle brushes and a non-abrasive sponge can agitate joints and textured areas without deliberately cutting the glazed surface.
Where the appearance suggests contamination, the sequence is conceptual rather than a polishing programme:
- Compare the affected tile with a nearby clean-looking area under the same light.
- Remove loose grit before wet cleaning so small particles cannot create abrasion risk.
- Consider whether the pattern follows grout joints, textured grooves, water marks or a contact line.
- Stop any abrasive treatment if scratches, altered texture or reduced grip becomes visible.
Long-term maintenance protects both appearance and grip when it removes grit before wet mopping and avoids detergent film. UK hard-water deposits, bathroom limescale and kitchen grease need suitable residue control rather than repeated buffing. A suitable safe ceramic tile cleaning approach explains why extraction matters where ordinary wiping leaves contamination behind.
Correct ongoing care keeps the original finish clearer and helps anti-slip surfaces retain their intended performance. Detergent-heavy products should be avoided because their film attracts fresh soil and can start a residue lock-in cycle, where accumulation, bonding, failed cleaning and redeposition reinforce one another, leaving the floor looking dull and becoming dirty again soon after cleaning.
Why Sealing Will Not Fix the Tile Face
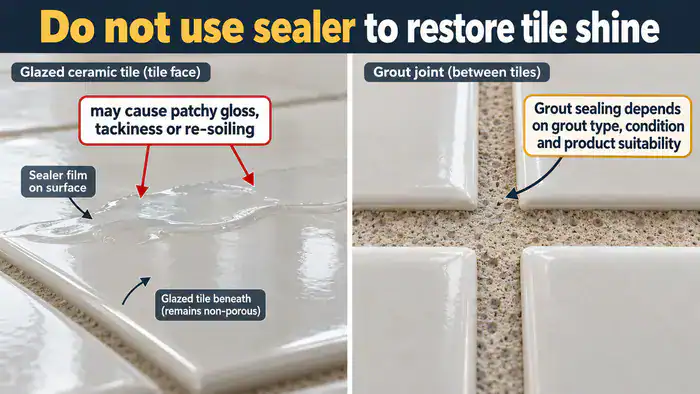
If your glazed ceramic face looks dull beside darker grout, sealer cannot restore its shine or rebuild damaged glaze. The tile face already presents a non-porous barrier, so a coating sits on the surface rather than entering an absorption pathway. Patchy gloss, tackiness and faster re-soiling can follow when a product intended for porous materials is applied to ceramic.
Standard glazed ceramic differs from adjacent cementitious grout because grout contains open pores and the factory surface does not. A penetrating grout sealer can reduce absorption within the joints, but it cannot reverse honing marks, remove scratches or reconstruct the fired decorative layer. This is also why a grout treatment may improve the appearance of the whole floor without changing the tile face.
Unglazed ceramic tile is the material exception because its exposed clay surface can absorb moisture and staining. That porous surface may need a carefully selected protective treatment, whereas a matt appearance alone does not prove that a glazed tile lacks protection. The material, finish and installation history need to establish whether sealing relates to the tile or only to the grout.
A professionally restored installation can look significantly better when surface residue and discoloured joints no longer obscure the original finish. Grout renovation can sometimes make the floor appear better than when first installed. It also becomes easier to clean and maintain when grout protection suits its porosity; a coating placed on the wrong surface simply creates another maintenance problem rather than a durable shine.
When Ceramic Tile Polishing Compound or Diamond Polishing Pads Cross Into Tile Damage
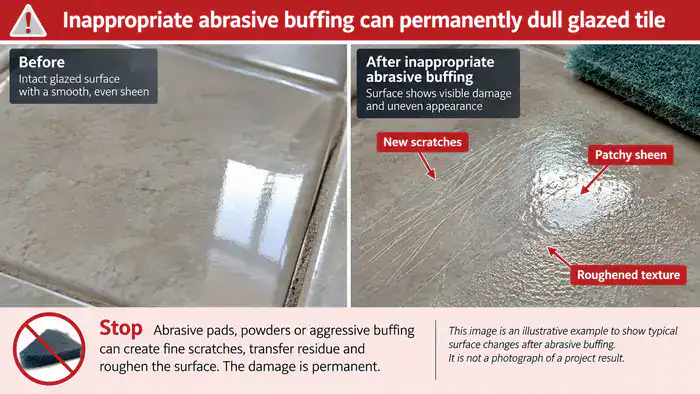
If buffing has left your floor with new scratches, patchy shine or an altered texture, stop before the damage becomes permanent. Look across the floor under raking light and stop if new scratches or altered texture become visible. A glossy patch created by buffing may be transferred residue rather than improved ceramic, whilst retained linear marks indicate that the surface itself has started to change.
An abrasive compound intended for another tile type can carry fine particles across glazed tiles and increase the damage risk. Specialised pads can intensify that mechanical abrasion.
Glaze breakthrough exposes a porous-looking tile body that can trap soil in the damaged area. A homeowner may notice a rough patch, a scratch that darkens after mopping, or a mark that no longer reflects light like the surrounding tile. Further polishing cannot restore the original impervious layer. What began as an attempt to improve shine has then become a permanent defect.
Metal residue transfer can make abrasion damage harder to interpret because a mechanical deposit may create a dark scuff line without cutting a groove into the glaze. A zero groove and a mark that responds to non-abrasive removal suggest transferred soft metal, whereas a line that catches a fingernail suggests physical damage. Confusing the two can lead to unnecessary pad use.
Changed slip rating performance is another clear stop point on textured or anti-slip tiles. If grooves feel smoother, grip changes when wet, or a cleaning pass leaves a visibly altered track, the intervention has affected the surface features supporting safety. Compare the floor with an untouched section before describing a temporary glossy patch as restoration.
When to Seek Professional Tile Restoration: Contractor Evaluation Criteria and Tier 2 Next Steps
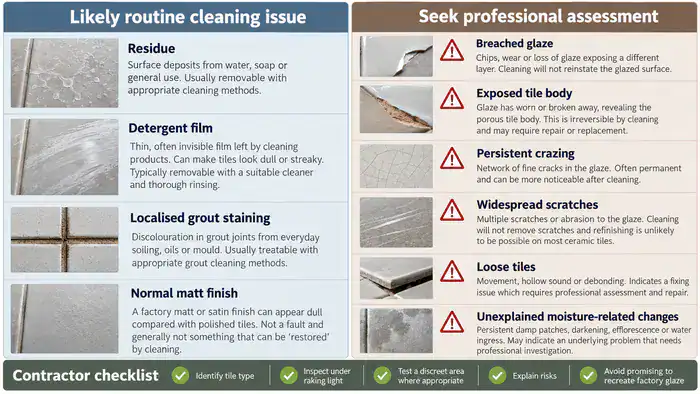
Persistent damage after appropriate care warrants professional assessment rather than another attempt at ceramic tile honing. A contractor should distinguish routine residue, grout staining and a non-reflective matt finish from breached glaze, persistent crazing, exposed tile body or a change affecting safe use.
Professional assessment should consider the tile face and grout separately, check for possible moisture sources, and distinguish tile damage from wet-room or joint problems.
A suitable contractor can explain whether cleaning, grout renovation, recolouring, replacement or no intervention best matches the condition found. The proposed work should preserve the factory glaze, avoid abrasive polishing on glazed ceramic, and account for textured finishes, grout porosity, hard-water deposits and the installation environment.
Homeowners can ask how the contractor will distinguish a surface deposit from a retained scratch, whether grout and tile will be assessed separately, and whether any proposed coating belongs on a porous adjacent material rather than the ceramic face. Those questions keep the decision focused on feasible restoration or replacement routes instead of a generic polishing promise.
The correct outcome depends on the condition found, but where contamination or grout appearance is causing the problem, the floor should look significantly better after intervention. Suitable ongoing care then helps the installation stay cleaner for longer and extends its useful life; broader principles appear in the ceramic and porcelain floor-care hub.

David Allen — Abbey Floor Care
David Allen has more than 30 years of experience helping Abbey Floor Care clients understand ceramic tile, porcelain and grout behaviour across UK homes. His work focuses on distinguishing residue, grout deterioration and genuine glaze damage, helping homeowners protect the original ceramic finish and avoid unsuitable polishing.
If you would like to apply to become the contractor for this area, please use the contact form.
Copyright © Abbey Floor Care.
We are proud to be your local stone floor cleaning, polishing, and restoration specialists for homes and commercial properties in Central Scotland.
With years of experience working with all types of stone floors, our friendly and professional stone floor cleaning services can’t be beaten on price or service.
FAQ - Privacy Policy - Terms And Conditions
Abbey Floor Care is a participant in the Amazon Services LLC Associates Programme, an affiliate advertising programme designed to provide a means for websites to earn advertising fees by linking to Amazon.co.uk. As an Amazon Associate, we earn from qualifying purchases.