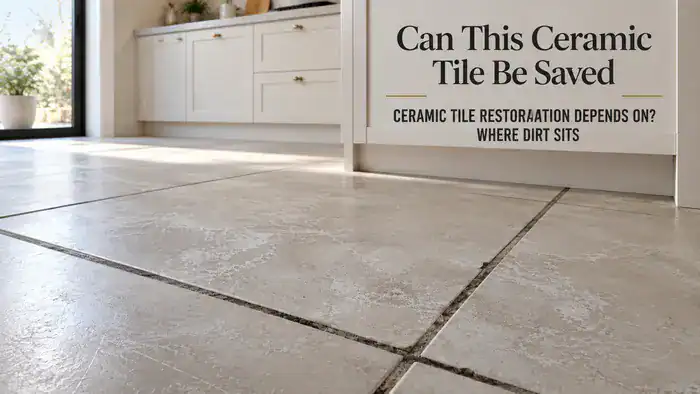
Ceramic Tile Restoration Depends On? Where Dirt Sits
Last Updated on September 30, 2026 by David
Ceramic tile restoration can address grout haze, mould, residue and ingrained soil. Grout haze is a thin residue film on tile faces, usually visible as a cloudy or streaked finish, and appropriate cleaning can remove it. Mould is visible fungal growth, often seen as dark spotting in joints, and treatment can remove the visible growth. Residue lock-in is cleaning residue or soil held on the surface, visible as recurring dullness or patchiness, and targeted cleaning can release it. It cannot recreate a chipped factory finish, reverse deep glaze damage or level an uneven installation. The key question is whether the poor appearance is sitting on the tile, held within the grout, or caused by damage to the tile itself.
What Ceramic Tile Restoration Can—and Cannot—Fix at Different Damage Severities—and the Common Ways It Fails
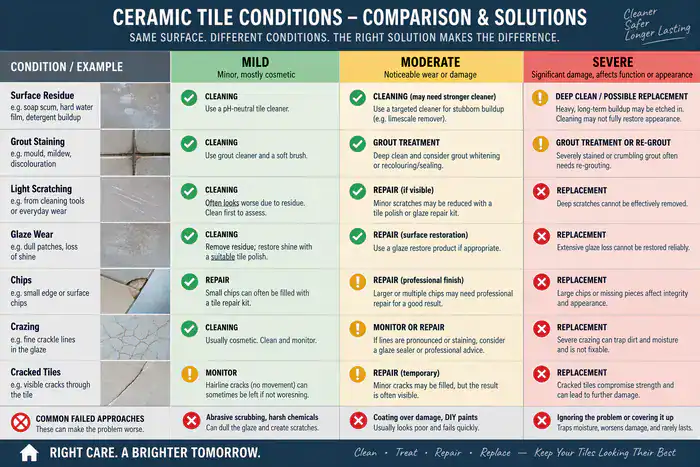
If your ceramic tile has a patch that looks cleaner in one light but still catches the eye from a low angle, that improvement may simply mean contamination has been removed rather than surface damage reversed. Compare the area with an undisturbed tile in the same lighting before deciding on the result. A remaining difference in sheen, colour or surface continuity can point to altered grout or glaze damage, rather than soil that still needs removing.
Removable surface contamination will usually spread across the tile face or settle into its texture, whilst the tile beneath retains its original appearance. Installation residue, detergent film, hard-water deposits and embedded dirt can all give a strong impression of wear even where the visible ceramic surface is still sound.
Altered grout has a different pattern. Colour loss is fading or uneven loss of the grout’s original colour, seen as pale or patchy joints. Cleaning can remove surface staining but cannot restore lost colour, so grout recolouring or renewal may be needed. Darkened joints and patchy grout staining follow the width of the joints rather than the shape of the tile faces. Restoration may improve the frame around each tile without changing the factory finish of the tile itself.
Physical damage creates a firmer boundary. Chips, deep scratches and an exposed porous tile body interrupt the original surface. The material underneath can retain soil more readily than an intact face and cannot regain its fired appearance through ordinary cleaning.
Glaze crazing failure is a network of fine cracks through the decorative surface. You may see hairline lines, darkened fissures or localised staining. Restoration can remove loose contamination around those areas, but it cannot recreate a continuous glaze; where damage is severe, a matching tile replacement may be needed.
Common failure routes include abrasive scouring, unsuitable acidic products and attempts to disguise a damaged face with a coating. These approaches can widen fine scratches, leave residue behind or blur the difference between a recoverable appearance issue and a permanent material defect.
How to Tell Residue from Discoloured Grout—and How Soil Behaves on Ceramic Tile and Grout
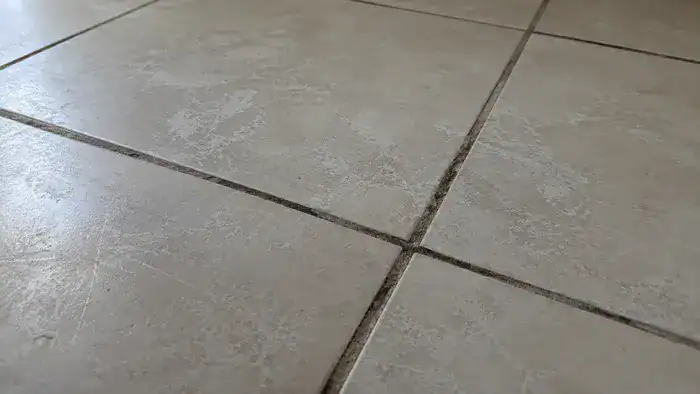
Residue tends to sit across the ceramic tile face, whereas discoloured grout generally follows the joint pattern. Look at both under the same light before treating similar-looking marks as the same problem. A film stretching across several tile surfaces suggests face residue; persistent darkening along the joints points towards soil held within porous cement-based material.
Cementitious grout porosity gives joints an absorption route that a glazed tile face does not have. Capillary voids within the cementitious structure can take in cooking grease, body oils, detergent residue and mineral films. As a result, contamination can move below the apparent surface even after repeated mopping.
Residue on the tile face behaves more like a covering than a stain within the tile. Polymer bonding can leave a tenacious film after installation, while soap scum, limescale and cleaning-product film can cause surface clouding. The pattern often crosses several tiles and changes as the light moves across the face.
Darkening confined to the joints suggests a different soiling mechanism. Soil absorption causes grout staining and colour degradation within the porous structure. That is why wiping the surrounding tiles may leave the joint pattern unchanged, and why a visually similar mark may need grout renovation rather than more face cleaning.
Professional deep cleaning separates these conditions by considering location, persistence and the response in a small test area, rather than applying one chemical across the entire installation. The difference between face residue and joint-held soil is covered further in this guide to deep cleaning ceramic tile floors, where extraction and grout agitation receive separate consideration.
A tile that looks clean beside persistently dark joints has not necessarily been restored unsuccessfully. It may simply show that the non-porous face has recovered, while the absorbent joint still needs colour restoration, repair or protection.
Why Ceramic Tile’s Material Origin, Manufacture, Internal Structure and Finish, Surface Structure and Micro-Feature Behaviour Change How Cleaning Works and What You Can Safely Use
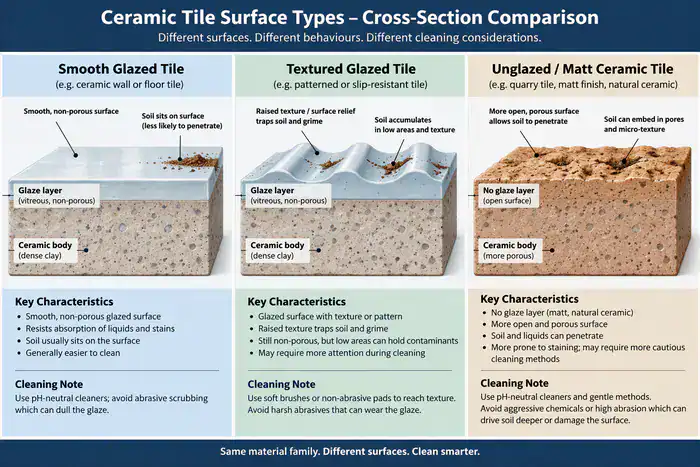
Repeatedly scrubbing a patchy floor can make the diagnosis harder rather than leaving the surface cleaner. Ceramic tile combines a kiln-hardened body with a decorative finish, and the finish type, relief and joint geometry all affect where soil remains and how much visible variation persists after restoration.
Textured tile grooves can hold visible soil even where the glazed surface remains intact. Anti-slip ridges, riven effects and embossed patterns create sheltered areas where fine particles, detergent film and cooking grease escape ordinary wiping. Controlled mechanical agitation can improve the appearance, but aggressive abrasion may damage the finish or alter slip-rating performance.
Texture can hold soil even when the glazed tile face remains intact, so repeated dark lines do not automatically prove that the ceramic surface has failed.
Matt and non-reflective finishes also affect visual judgement. Dust marks, water marks, streaks and cloudy spots scatter light across the surface, while a glossy face reflects a clearer image. Both finishes can receive the same restoration and still look different when viewed from a low angle.
Tile lippage discrepancy is a vertical edge offset between neighbouring tiles. Uneven tile joints may catch a mop, collect dirt along a raised edge and cast changing shadows. Cleaning can reveal a cleaner installation, but it cannot correct the underlying height variation.
Installation geometry therefore influences the apparent result independently of contamination. A floor with consistent colour can still look uneven where edge alignment varies across the room. Repeated dark lines within grooves, by contrast, may indicate retained surface dirt rather than lippage.
Material-sensitive assessment matters. A soft nylon bristle pad and a polypropylene brush behave differently on a smooth glaze, textured relief and recessed grout. The wider behaviour of ceramic and porcelain installations is covered in the ceramic and porcelain flooring resource, which considers finish, joints and installation conditions together.
Why Glazed Ceramic Resists Stains but Damaged Areas Do Not
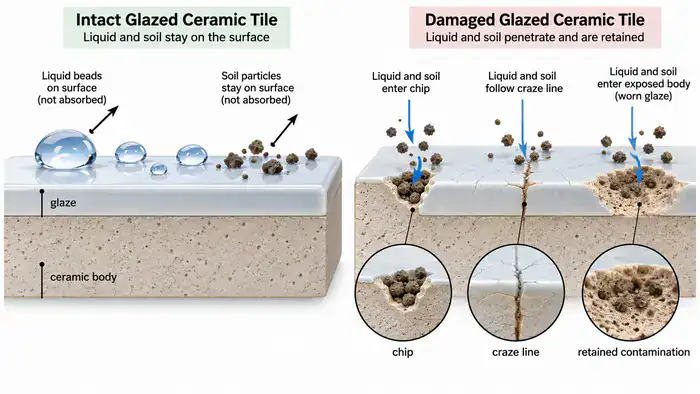
Abrading a glazed ceramic tile to remove a mark can create a more permanent issue. Inspect chips, fine crazing and worn areas under raking light before assuming the surface only needs cleaning. A continuous factory-finished appearance around the mark supports a contamination explanation; an interrupted surface points towards physical damage.
The factory-fired glaze forms a vitreous surface during kiln firing. Its non-porous structure provides a permanent finish and an impervious layer over the ceramic body, so ordinary spills remain on the face rather than travelling into the tile. Residue can still sit on top or collect within surface texture.
This resistance is why a glazed face normally responds to residue removal rather than restorative polishing. Mechanical abrasion can cut through the ceramic glaze, expose the body beneath and create fine scratches that retain soil. A process suited to natural stone or burnishable porcelain does not transfer safely to glazed ceramic.
Glaze crazing failure breaks the continuous finish with a hairline network of cracks. Thermal expansion mismatch can stress the glaze against the body, and dark dye absorption, dark lines or moisture-related marking may become visible within the fissures. Cleaning can improve contamination around them, but it cannot fuse the cracks closed.
An exposed porous tile body occurs where a chip or deep scratch has removed the top layer. Water can seep into that porous surface, mould can gain a foothold and the durable surface loses continuity. Cleaning may reduce visible soil, but it cannot restore the missing protective layer.
Chips and worn-through areas need a different expectation from surface residue. Where a suitable tile is available, a matching replacement can restore a continuous factory finish. A local repair may reduce visibility, but it cannot reproduce the original glaze, pattern and sheen perfectly.
Polishing terminology causes particular confusion. Non-abrasive buffing can remove cleaning residue, whereas diamond polishing pads or fine-grit sandpaper alter the surface itself. The difference between apparent shine and permanent finish damage is also addressed in what polishing can and cannot do to ceramic tiles.
When Sealing Helps Grout but Not the Tile Face—and How to Maintain Both Over Time
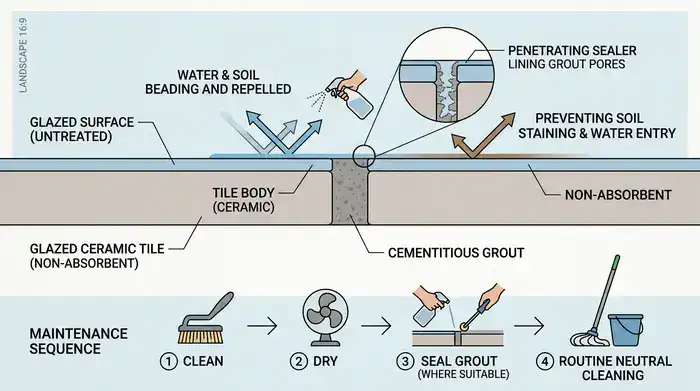
If a ceramic tile floor looks clean but the grout darkens again quickly, the absorbent joints are likely to be the weak point rather than the surrounding tile face. Cementitious grout porosity allows water, soil and oily residue into capillary voids, so visual consistency can be lost even while the glaze remains sound.
Grout protection works through penetrating pore sealing or a compatible surface coating that reduces absorption. An impregnating grout sealer forms an internal water-repellent barrier whilst retaining a breathable character. An epoxy grout colourant, meanwhile, creates a durable non-porous finish where colour restoration and joint protection are needed together.
Protection cannot reverse colour degradation, fill missing joints or repair a cracked tile. The factory-fired glaze already gives the tile face its impermeable barrier, so sealer applied to smooth glazed ceramic usually remains as surface residue, attracts soil and creates maintenance issues rather than improving the material.
Textured or worn areas need more specific consideration because grooves and scratches can retain soil mechanically. A specialist may assess whether an impregnator reduces soil attraction within those features. But it does not turn a damaged face into a new factory finish, nor does it justify sealing every tile indiscriminately.
Correct day-to-day maintenance protects the grout frame and keeps the glazed face free from residue, making the restored installation easier to care for. pH-neutral tile cleaner, prompt grit removal before wet mopping and careful drying in wet rooms all support that outcome. Bleach and strongly acidic supermarket products can strip colour or erode joints.
The difference between useful grout protection and an unsuitable whole-surface coating is explained in guidance on wax and sealant for ceramic tiles. Ongoing care remains the most important factor in extending the floor’s life, because loose grit creates abrasion risk and repeated residue accumulation can restart the redeposition cycle.
Which Defects Need Repair or Replacement—and When to Move to Tier 2
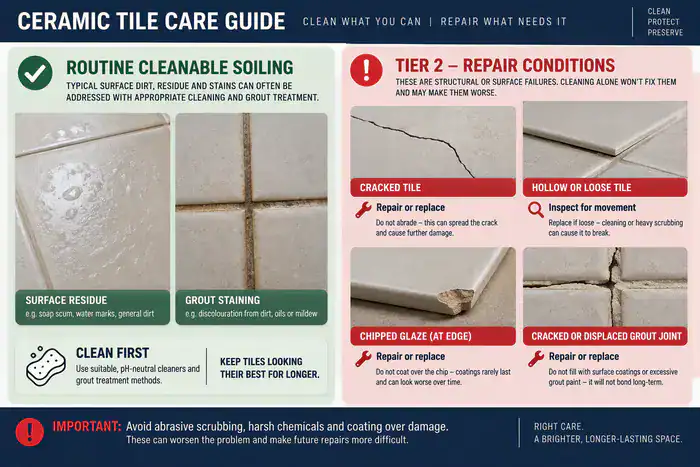
Treating a cracked joint or chipped glaze as ordinary soiling can delay the right intervention. Follow the grout lines and tile edges with the eye: where the same defect remains after the surrounding surface has been cleaned, the condition may have moved beyond routine restoration.
A useful assessment separates appearance from physical condition before Tier 2 work is recommended. The contractor should identify the observed defect, relate it to the affected part of the installation and explain whether restoration, repair, replacement or specialist escalation addresses the actual cause.
- Identify whether the visible change crosses tile faces, follows grout joints or remains within a chip, crack or textured groove.
- Separate removable surface contamination from failed grout, glaze crazing failure, an exposed porous tile body and tile lippage discrepancy.
- Match the proposed intervention to the named condition, explaining why cleaning, grout renovation, joint repair or tile replacement fits the evidence.
- State the boundary clearly where the tile needs replacement, the joints require re-grouting, movement affects the installation or specialist assessment must come before further work.
Glaze crazing failure needs escalation where fissures continue to collect dark contamination or show moisture-related change. An exposed porous tile body also warrants repair or replacement where water ingress, mould or weakening affects the tile itself rather than simply its appearance.
Tile lippage discrepancy needs particular care. Cleaning can remove dirt beside a raised edge, but it cannot create a flush surface. Lippage exceeding 2mm may remain visibly and physically significant without prior levelling work, so the recommendation should record the height variation rather than present cleaning as a correction.
Evidence-based escalation protects the installation from unsuitable treatment. A specialist ceramic tile repair assessment can connect cracked or loose tiles, failed joints and movement to the appropriate repair route; homeowners can find that service context through ceramic tile repair contractor information.
How to Evaluate a Restoration Contractor’s Recommendation

A credible restoration recommendation should still stand up when the contractor examines the grout joints and tile faces after explaining the proposed work, rather than relying only on a product name promising a renewed finish. It should identify what has been observed, which part of the installation the method addresses, what appearance cannot be restored and what maintenance outcome should follow.
Material suitability is the first test. A proposal should distinguish glazed ceramic from polished porcelain, unglazed tile and natural stone, because mechanical refinishing can damage a ceramic glaze and tile sealer can leave residue on a non-porous face.
The second test is defect completion. The contractor should define whether the issue involves polymer grout haze, discoloured grout, mould, glaze crazing, a chipped body or lippage, then connect that condition to the visible evidence and the proposed correction.
Realistic limitations should be explained before work begins, not after an unsuccessful treatment. A sound explanation will make clear that grout recolouring can transform the visual frame, residue removal can reveal an intact face, and a missing or damaged factory finish may require replacement.
Care guidance is the third test because the result depends on what happens afterwards. The contractor should explain why pH-neutral cleaning, grit removal and suitable drying protect the result, whilst abrasive pads, bleach and acidic routine products can restart surface contamination or weaken grout.
A restoration recommendation earns confidence when it links material, defect severity and expected maintenance instead of relying on product claims alone. The floor should look significantly better than before intervention, be easier to clean and maintain, and retain a clear boundary between recoverable appearance problems and conditions requiring Tier 2 repair.
Homeowners comparing recurring dullness with genuine damage can also consult why ceramic tile floors can look dull after cleaning before accepting a treatment description. That context helps distinguish residue lock-in, where cleaning residue or soil is held on the surface and appears as recurring dullness, from a permanently altered surface; targeted residue removal may improve it, but a general explanation is not a substitute for site assessment.

David Allen — Abbey Floor Care
David Allen has more than 30 years of experience with ceramic tile restoration and related floor-care decisions across the UK through Abbey Floor Care. His educational work focuses on helping homeowners distinguish recoverable residue and grout deterioration from glaze damage, exposed tile bodies and installation defects, so the correct restoration boundary is clear.
Recent Posts:
We work throughout the country, just some of our work counties:
Copyright © 2026 Abbey Floor Care. Tile And Natural Stone Cleaning Consultants FAQ - Privacy Policy - Terms And Conditions
Abbey Floor Care is a participant in the Amazon Services LLC Associates Programme, an affiliate advertising programme designed to provide a means for websites to earn advertising fees by linking to Amazon.co.uk. As an Amazon Associate, we earn from qualifying purchases.