Removing Etching from Stone Surfaces in Surrey
🔑 Key Takeaways for “Removing Etching from Stone Surfaces in Surrey”
-
- Etching is not dirt—it’s surface damage caused by acidic spills on natural stone like marble, limestone, or travertine.
- Light etching can’t be cleaned away—it requires polishing or honing to restore the finish.
- DIY fixes are limited—0000-grade wire wool may help with mild etching, but polishing creams should be used with caution.
- Professional restoration is a safe and effective process; technicians inspect, hone, polish, and seal the stone to restore it to its original finish.
- Sealing is essential—it protects against future etching and makes cleaning easier.
- Common mistakes include using vinegar, bleach, or household polish, as these can exacerbate the damage.
- Surrey homes often feature vulnerable stone surfaces in kitchens, bathrooms, and hallways, so regular care is key.
- Visual checks help—use angled lighting and photos to spot and document etching early.
- Choose experienced technicians—look for local experts with proven results and tailored advice.
- Preventative care matters—use mats, coasters, and pH-neutral cleaners, and re-seal every 12–18 months.
How to Fix Dull or Cloudy Stone Surfaces in Your Surrey Home
If you’ve ever noticed cloudy patches or dull spots on your kitchen worktop, bathroom vanity, or hallway floor, you’re not alone. Many homeowners in Surrey encounter this issue, particularly with natural stone surfaces such as marble, limestone, or travertine. These marks aren’t just dirt—they’re often caused by something called etching. And while they can look permanent, they’re usually fixable.
Pro Tip: We recommend these products for daily Marble maintenance cleaning.

Fila Pro Floor Cleaner
|

LTP Floorshine
|

Vileda H2PrO Spin Mop System
|
Let’s walk through what etching is, how to spot it, and what you can do to restore your stone’s natural beauty.
What Is Etching—and Why Does It Happen?
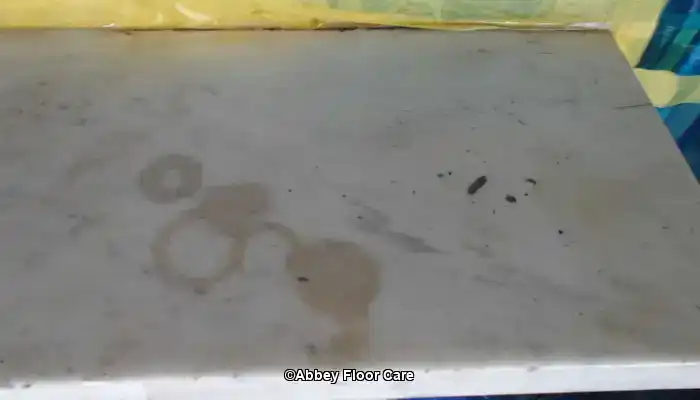
Etching is a chemical reaction that happens when acidic substances come into contact with natural stone. Think lemon juice, vinegar, wine, or even some bathroom products. These acids react with the minerals in the stone, leaving behind dull spots or cloudy rings that regular cleaning won’t remove.
It’s especially common on polished surfaces, such as marble and limestone, which reveal imperfections more easily. If you’ve ever wiped a spot and noticed it disappears when wet but comes back when dry—that’s a classic sign of etching.
Can You Fix It Yourself?
If you’ve spotted a dull patch or cloudy ring on your stone surface, your first instinct might be to grab a cloth and cleaner. But here’s the truth: even light etching isn’t just surface dirt—it’s actual damage to the stone’s finish. The top layer has been chemically dissolved, so no amount of wiping will restore the shine.
That said, there are a couple of things you can try—carefully.
Try This First
For very mild etching, you can gently rub the area with superfine 0000-grade wire wool. Use it dry, without water or any other cleaning agent. Sometimes, this can lightly polish out the mark and restore a bit of the original finish. It’s best to test a small, inconspicuous area first.
If that doesn’t work, you might consider using a stone polishing cream. But be cautious—these creams are acidic and require experience to apply correctly. If misused, they can create a “halo” effect around the etched spot, making the damage even more noticeable.
When to Call a Professional
Here’s a quick way to assess whether DIY is worth trying:
- Is the spot smooth but dull, not rough or pitted?
- Does it disappear briefly when damp, then return when dry?
- Is it in a high-visibility area, like your kitchen island or bathroom counter?
If you answered yes to any of these, it’s probably time to call a stone care expert. Many Surrey-based professionals offer quick assessments and can restore the surface without replacing it—saving you time, stress, and the risk of making things worse.
What Do Professionals Actually Do?
Stone restoration is far more than a deep clean—it’s a skilled, multi-step process that brings your surfaces back to life while protecting them for the future. If you’ve got dull patches, cloudy rings, or etched areas on your marble, limestone, or travertine, here’s what a trained technician will typically do.
Step 1: Inspection and Diagnosis
The first thing a professional will do is inspect the stone closely. They’ll identify the type of stone (which affects how it reacts to treatment), assess the depth of the etching, and determine whether the damage is surface-level or more ingrained. This step is crucial—using the wrong method on the wrong stone can cause permanent damage.
Homeowner tip: If you’re unsure what kind of stone you have, a sound technician can usually identify it from a photo or a quick visit.
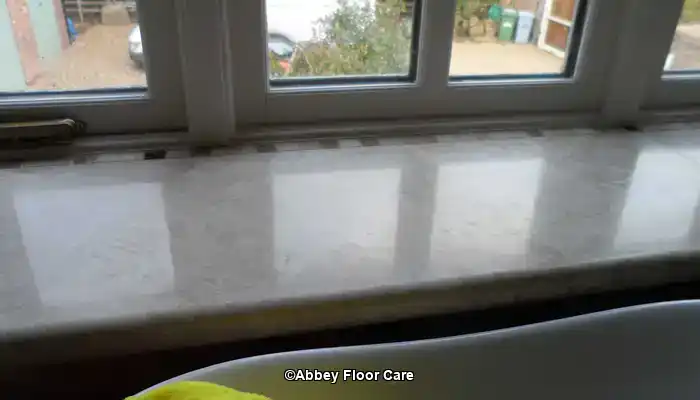
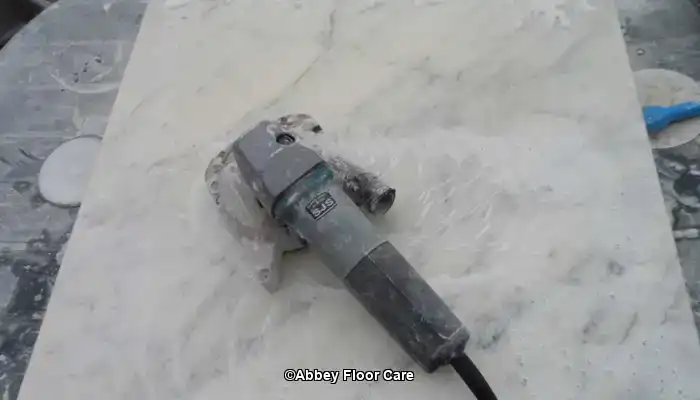
Step 2: Honing the Surface
Once the technician understands the issue, they’ll begin honing—a process that uses ultra-fine abrasives to remove the top layer of damaged stone gently. This isn’t sanding or grinding. It’s a controlled, precise technique that smooths out the etched area without affecting the surrounding surface.
For example, if you’ve got a dull ring on your marble bathroom vanity from a mouthwash spill, honing can remove that ring and blend the finish seamlessly.
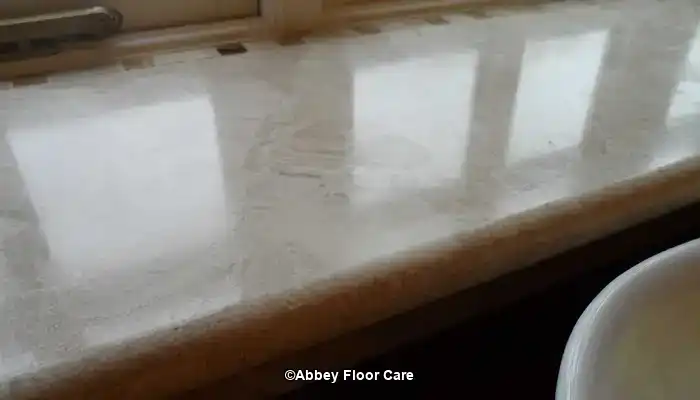
Step 3: Polishing to Match Your Finish
After honing, the technician will polish the stone to match its original finish. Whether you prefer a soft matte look or a high-gloss shine, they’ll use the right tools and compounds to achieve a consistent result across the entire surface. This step restores clarity and depth to the stone, making it look fresh and elegant again.
Note: Polishing creams are sometimes used, but only by experienced professionals. These products are acidic and can create a “halo” effect if not applied correctly—especially on polished marble.
Step 4: Sealing for Protection
Finally, the technician will apply a protective sealer. This helps guard against future etching and staining by creating a barrier between the stone and everyday spills. The best sealers are breathable, allowing moisture to escape while keeping contaminants out.
Keeping Your Stone Looking Beautiful
Once your stone is restored, a few simple habits can help keep it that way:
- Use pH-neutral cleaners made for stone
- Wipe up spills quickly—especially acidic ones like wine or tomato sauce
- Avoid multi-surface sprays, bleach, or vinegar
- Use mats near sinks and coasters under drinks
- Re-seal your stone every 12–18 months
These steps are easy to follow and make a big difference. One homeowner in Surrey kept her marble kitchen island spotless for years with just regular cleaning and sealing.
Why Surrey Homes Need Special Care
Surrey homes often feature beautiful stone surfaces, from heritage flooring to modern kitchen finishes. But not all stone is the same. Marble, limestone, travertine, and sandstone each have their own quirks—and knowing what you’re working with helps you care for it properly.
If you’re unsure of the type of stone you have, take a photo and send it to a local expert for identification. They’ll usually be able to tell you right away and suggest the best treatment.
How to Spot Etching Early
The sooner you catch etching, the easier it is to fix. Look for:
- Dull spots or cloudy rings that don’t wipe away
- Marks that disappear when wet but return when dry
- Smooth areas that have lost their shine
Use angled lighting or your phone’s flashlight to highlight surface changes. And if you’re booking a service, include a photo with a coin or ruler for scale—it helps technicians give accurate advice.
Choosing the Right Technician
Not all cleaners are stone experts. When hiring someone to restore your surfaces, look for:
- Experience with your specific stone type
- Before-and-after photos of similar jobs
- Clear quotes and explanations of their process
- Good reviews from other Surrey homeowners
A trusted technician will guide you through your options and help you select the ideal finish for your space.
DIY vs Professional: What’s Worth It?
DIY kits can help with light cleaning, but they rarely effectively remove etching. In fact, some contain acids that can exacerbate the problem. If the damage is in a visible area or covers a large surface, professional restoration is usually the better choice.
It’s not just about looks—it’s about protecting your investment and avoiding costly repairs down the line.
Final Thoughts
Etching is frustrating, but it’s not the end of your stone surface. With the proper care—and a little help when needed—you can keep your kitchen, bathroom, or hallway looking polished and elegant for years to come.
If you’re unsure what to do, take a photo and reach out to a local expert for guidance. A quick assessment could save your surface—and your budget.
19 Willow Rd,
New Malden
KT3 3RS
(01372)-664-337
We work throughout the country, just some of our work counties:
Copyright © Abbey Floor Care. Natural Stone Floor Restoration in Surrey and South West London FAQ - Privacy Policy - Terms And Conditions
Abbey Floor Care is a participant in the Amazon Services LLC Associates Programme, an affiliate advertising programme designed to provide a means for websites to earn advertising fees by linking to Amazon.co.uk. As an Amazon Associate, we earn from qualifying purchases.