
How To. Restore Victorian Floor Tiles Safely
Last Updated on May 23, 2026 by David
Victorian tile floors often stay dull, patchy, and difficult to clean long after repeated mopping because contamination sits deep inside the porous clay body, beneath old coatings, or around unstable repairs. This guide explains how professional victorian tile restoration identifies wear, adhesive residues, moisture movement, and failed surface treatments before controlled cleaning and sealing can begin safely.
This video gives a quick overview of the Victorian Tile restoration before the full step-by-step details explained below.
Why Victorian tile floors still look dirty after repeated cleaning and mopping
If your victorian tile floor still looks patchy and lifeless after repeated mopping, the issue is usually sitting below the visible surface. Standard household cleaning removes loose dirt reasonably well, but it rarely touches ingrained grime, wax build-up, old sealers, carpet adhesive residue, or moisture staining that continues darkening the floor once it dries.
Traffic Wear And Surface Dulling
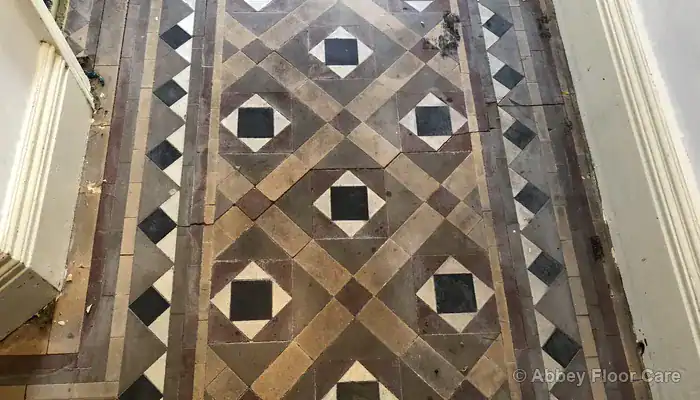
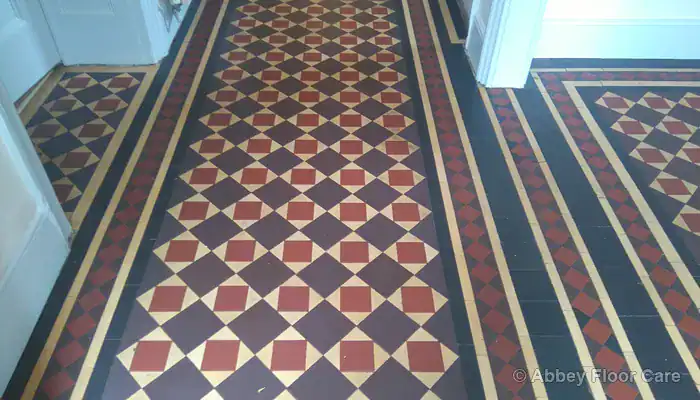
If your floor shows worn traffic lanes through the centre of the hallway, decades of foot traffic have normally worn away the original fired surface and exposed a softer, more porous clay layer beneath. Heavy wear is usually most obvious around entrances, geometric borders, and narrow walkways where lighter buff tiles tend to wear faster than the darker black and red sections. Victorian encaustic and geometric tiles are fired clay products, so whilst the surface is chemically stable, it remains physically vulnerable to abrasion and unsuitable for aggressive acidic cleaning.
Once the surface starts wearing unevenly, shallow depressions develop across the busiest areas of the floor. Dirt and moisture settle heavily into those low spots after cleaning. In my experience, hallways showing this pattern have often been scrubbed repeatedly over many decades using abrasive pads, harsh powders, or rotary cleaning equipment that gradually stripped away the historic tile face and weakened delicate clay inlays. Floors affected by this kind of wear usually continue looking dirty because the exposed tile body absorbs contamination far more readily than intact areas.
Original victorian floor tiles were commonly laid edge to edge with very fine joints over lime mortar screed or compacted ash bedding. Once wear becomes uneven, ordinary mopping simply redistributes dirty residue across the floor instead of removing it properly. The surface often looks cleaner whilst wet, then turns dull again as soon as it dries because the contamination remains trapped inside the porous clay structure.
Severely worn floors often contain a mixture of encaustic dust-pressed tiles, quarry tiles, and later repair sections using mismatched replacement materials. Geometric borders become difficult to read once grime settles deeply into the worn areas. A professionally restored and correctly sealed floor is dramatically easier to maintain because contamination no longer sinks so deeply into the exposed surface.
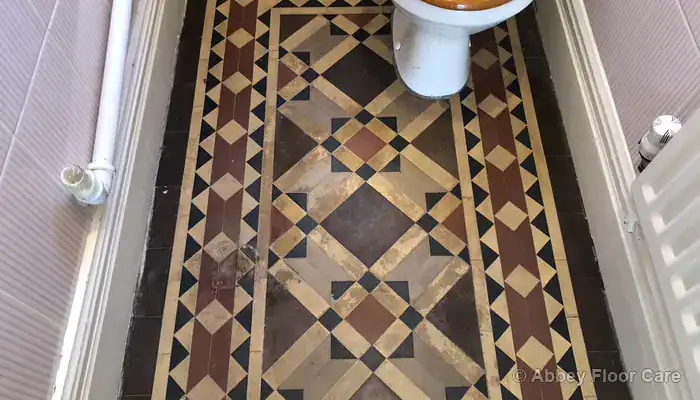
Carpet Adhesive And Gripper Damage
If your floor shows dark adhesive marks along the wall edges, previous carpet installation has normally introduced glue residues, gripper rods, and surface damage hidden beneath later coverings. Carpet adhesive contamination usually appears as yellow-green staining, black bitumen smears, or hardened brown patches where coverings were fixed directly onto the tiles.
Victorian tiled hallways were regularly covered with lino, carpet, and impervious flooring throughout the twentieth century. Those coverings trapped moisture and contamination beneath the surface for years. Carpet gripper nails also caused extensive perimeter damage where tiles were chipped, drilled, or lifted during removal. Some floors still contain old fixing holes filled with molten lead or rough cement patch repairs around the edges.
Carpet and lino adhesive residue normally spreads much further than people expect because old glue softens unevenly and smears across the floor during failed DIY cleaning attempts. Paint contamination and adhesive staining can also soak directly into the tile pores if strong solvents are used incorrectly or left sitting on unglazed clay surfaces. Floors at this stage usually need careful restoration sequencing before sealing or maintenance products are even considered.
Many period properties also contain old waxes, acrylic sealers, linseed oil coatings, and surface polishes that have gradually blackened with age. Once absorbed into the tile body, these old coatings often leave the floor permanently greasy-looking and difficult to rinse clean. Standard detergent rarely shifts them properly. And that is why so many old victorian floors still feel sticky and patchy after mopping.
Loose Tiles And Failed Bedding
If your floor shows raised corners, movement, or hollow sounds underfoot, sections of the original bedding layer may already have failed beneath the tiles. Loose tile movement is extremely common in older hallways where rubble and lime-based substrate materials have shifted gradually over time, or where plumbing and electrical works disturbed the floor structure years later.
Victorian geometric floors were often fitted over semi-dry screed bedding, compacted ash, or suspended timber floors without any damp proof membrane beneath them. Once moisture starts entering these permeable subfloors, tiles can loosen, sink, or detach from the original bed. Raised and sunken sections usually appear around fireplaces, door thresholds, or earlier repair areas where modern concrete patching replaced historic materials without matching the original floor depth.
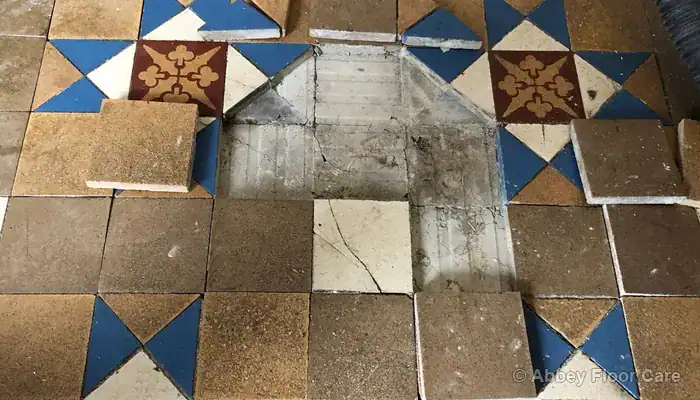
Once movement spreads across the hallway or grout joints repeatedly crack after cleaning, structural stabilisation usually becomes necessary. Proud edges, unstable joints, and castellated lippage are strong indicators that earlier repairs used rigid cement instead of lime-compatible bedding materials suited to historic floors. Loose sections also become far more vulnerable if rotary cleaning machines or excessive water are used before the floor has been stabilised correctly.
Pattern-matched replacement tiles are often required where missing sections interrupt the original geometric layout or border continuity. Many repairs now rely on salvaged originals, reclaimed stock, or accurate reproduction tiles cut to imperial dimensions so the restored floor blends naturally with the existing design. Careful examples of minton tile floor restoration and replacement work can be seen in this minton tile floor restoration project in Ovington, where unstable sections, failed coatings, and damaged repairs were corrected without disturbing the wider floor unnecessarily.
White Deposits And Surface Bloom
If your floor shows pale white marks that return after drying, moisture is usually carrying mineral residue upward through the porous clay body and grout joints. Powdery white bloom, calcium deposits, and recurring surface haze commonly appear during damp weather or after over-wetting older floors during cleaning.
Salt-related staining becomes much more obvious where historic floors were laid without modern damp proof membranes or where impervious coverings trapped moisture beneath the surface for years. Moisture rise through lime-based subfloors and porous clay tiles is particularly common in period hallways built directly over earth-supported construction. Even after cleaning, evaporation continues pulling dissolved minerals back to the surface, so the white deposits keep returning.
Some hallways also contain cement screed contamination, grout haze, plaster residue, or paint splatter left behind after later building works. Cement and grout haze often leave pale cloudy staining that becomes far more visible once the floor dries properly. Old topical sealers can trap those residues beneath the surface, leaving the floor looking permanently dirty even after repeated washing.
Correct maintenance is still one of the biggest factors in extending the life of a victorian tiled floor. Neutral pH cleaning fluid, proper grit removal before wet mopping, and resealing at sensible intervals all help reduce surface wear and moisture-related staining. Practical long-term maintenance methods for period hallways are explained in this victorian tile cleaning and maintenance guide, including why bleach and abrasive cleaners should always be avoided on fragile historic surfaces.
Why moisture-sensitive Victorian tile floors can be damaged by the wrong restoration methods
Repeatedly scrubbing a moisture-sensitive victorian tile floor often causes more damage than improvement. Steam cleaners, bleach, aggressive acidic detergents, and excessive water can drive moisture deep into old permeable subfloors where salts react during drying and leave persistent white staining across the surface.
Historic clay tiles fail when moisture and abrasion become trapped within the surface.
Older victorian floors installed without a damp proof membrane rely on slow natural evaporation through the tile body and grout joints. Excess water, harsh chemicals, and rotary cleaning disturb that balance by loosening weak bedding layers, lifting vulnerable edges, and triggering salt crystallisation beneath the floor surface. Steam cleaner heat damage is particularly risky because the combination of heat and moisture forces water into unstable joints and voids that cannot dry evenly afterwards.
Bleach discolouration, abrasive cleaner damage, and uncontrolled water application remain major risks because unglazed clay surfaces absorb cleaning products extremely quickly. Once trapped moisture and failed coatings stop water vapour escaping naturally, the floor often becomes increasingly unstable, stained, and difficult to restore safely.
How controlled cleaning removes deep contamination without damaging historic clay tiles
Controlled alkaline cleaning removes deep contamination without grinding away the original fired surface. Professional restoration usually begins with moisture readings, patch testing, and careful assessment of tile stability so the safest cleaning method can be selected before restoration starts.
Low-moisture gel cleaning is often the safest approach where old floors sit above suspended timber or cellar voids because far less water penetrates through the bedding layer. Non-ionic conservation detergents, alkaline cleaning solutions, and coating removers are normally applied neat or diluted to manufacturer instructions, allowed sufficient dwell time, then carefully agitated using soft-bristle brushes and non-scratch pads.
Wet vacuum extraction is equally important because it prevents contaminated slurry spreading back across the floor during rinsing. Rotary machine pore cleaning may still be used cautiously on stable floors with appropriate pads and controlled slurry removal, but aggressive abrasive pads and excessive saturation remain unsuitable for fragile encaustic surfaces. Breathable sealing systems allow residual moisture to evaporate naturally through the floor whilst still improving stain resistance and long-term maintenance performance.
What changes once Victorian tile floors are cleaned and stabilised properly
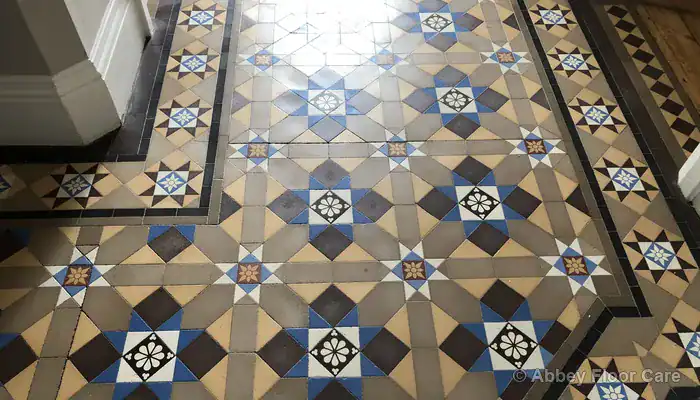
If your victorian tile looks pale immediately after restoration, the original surface is finally becoming visible again after years of trapped coatings, grime, and contamination have been removed. Colour depth, geometric detail, and border definition usually return once wax build-up, acrylic sealers, and old residue are stripped away safely.
Properly restored victorian geometric floors regain clarity without looking artificially glossy or over-finished. A restored floor should still retain the original fired matte appearance with consistent colour and pattern definition, whilst breathable topical protection — where suitable — adds only a subtle protective sheen. Low-sheen enhancing sealers and breathable impregnating systems are normally preferred because they protect porous clay whilst still allowing residual moisture and vapour movement through the floor naturally.
Permanent wear across busy traffic lanes may still remain visible where the original fired face has been completely worn away. Even so, the floor usually looks dramatically better after deep cleaning, stabilising repairs, and correct sealing. In many cases, the original layout and colour contrast become clearer than they have been for decades.
Which Victorian tile problems need restoration instead of more routine cleaning
Floors affected by movement, recurring white deposits, or unstable bedding normally need restoration rather than further routine cleaning. Loose sections, cracking grout joints, repeated dampness, and sinking areas almost always point to deeper structural issues beneath the visible surface.
Hallways affected by moisture intrusion, recurring salt bloom, or unstable bedding often require staged repair work, tile resetting, and controlled drying before sealing can safely begin. Lime mortar movement, raised edges, and missing geometric sections generally become worse if cleaning continues without resolving the underlying condition first. Floors in this condition frequently need salvaged replacement tiles, pattern continuity repairs, and stabilising treatment before cosmetic improvement is realistic.
Long-term maintenance still matters enormously once restoration has been completed correctly. Neutral pH cleaning, proper grit removal before mopping, and avoiding bleach or steam cleaning all help reduce future wear across vulnerable clay surfaces. Wider examples of victorian tile cleaning, restoration sequencing, and aftercare methods are covered throughout the victorian tile cleaning hub, including guidance on identifying moisture migration, failed repairs, and restoration viability in period hallways.

David Allen — Abbey Floor Care
David Allen has restored victorian tile floors across the UK for more than 30 years through Abbey Floor Care, including complex hallway projects affected by moisture damage, failed coatings, and unstable bedding layers. His restoration work focuses on careful cleaning, controlled moisture management, and accurate replacement methods that preserve original geometric layouts whilst improving long-term durability and maintenance.
If you would like to apply to become the contractor for this area, please use the contact form.
Copyright © Abbey Floor Care.
We are proud to be your local stone floor cleaning, polishing, and restoration specialists for homes and commercial properties in Central Scotland.
With years of experience working with all types of stone floors, our friendly and professional stone floor cleaning services can’t be beaten on price or service.
FAQ - Privacy Policy - Terms And Conditions
Abbey Floor Care is a participant in the Amazon Services LLC Associates Programme, an affiliate advertising programme designed to provide a means for websites to earn advertising fees by linking to Amazon.co.uk. As an Amazon Associate, we earn from qualifying purchases.