
Fill Small Holes In Travertine Tiles Safely Without Damage
Last Updated on July 15, 2026 by David
Which Travertine Holes Are Safe to Fill?
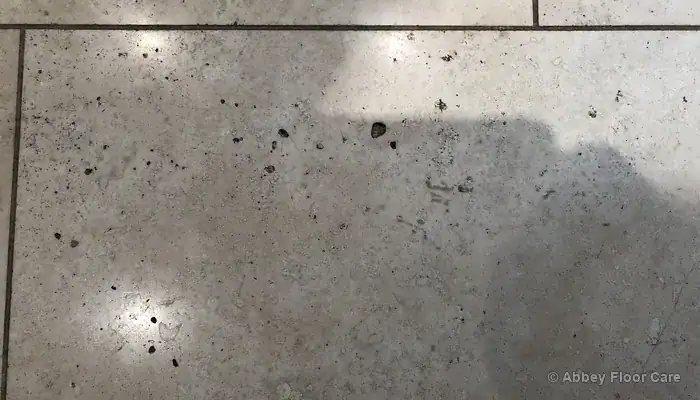
If a travertine hole is shallow, firm around the edges and does not catch the tip of a fingernail beneath a loose surface layer, it may be suitable for a small local fill. The opening should be isolated, show no movement and measure no more than a few millimetres across.
A newly visible hole does not automatically mean the tile has failed. Travertine develops natural cavities as part of its geological character, and normal pressure from foot traffic can expose a previously hidden void as the upper surface wears. Unfilled tumbled travertine already has open holes, an aged texture and rounded edges, so the visible pits may be intentional rather than defects that need repairing.
Use this simple diagnostic sequence before deciding whether to spot-fill the hole:
- If the cavity is shallow and the surrounding stone feels solid, then a colour-matched grout repair may be suitable.
- If loose fragments vacuum away but the remaining edge stays firm, clean the opening and inspect it again once dry.
- If the hole feels hollow beyond the visible edge, stop. The cavity may be larger than a local fill can support.
- If a crack spreads away from the opening, filling the pit will conceal only part of the problem.
- If the tile rocks, sounds loose or sits unevenly, the floor needs assessing before any filler is applied.
- If an earlier repair repeatedly reopens, weakened factory fill or movement beneath the tile may be involved.
Stable pits remain local and do not change during normal use. Floors with widespread pitting, blackened recesses or repeated filler loss need a wider diagnosis. The examples in our guide to pitted travertine in Reading show how extensive cavity contamination differs from one repairable hole.
What You Need for a Small Repair
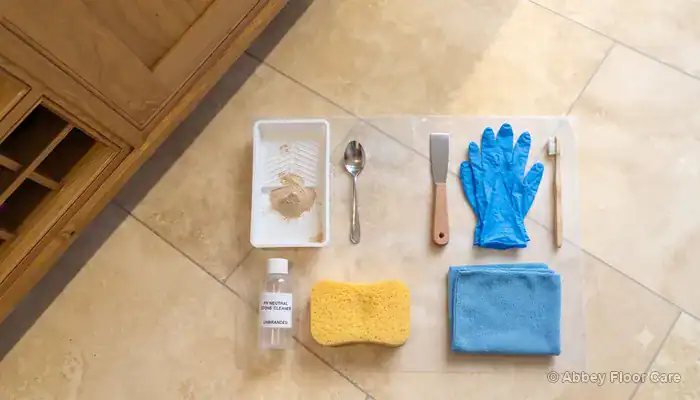
If a small travertine hole keeps collecting dark dirt, the repair area needs clean, dry stone and a filler that can be placed without slumping. Colour-matched sanded grout should feel workable rather than runny when pressed with a small applicator. A small test mix matters because the dry powder, wet mixture and fully cured repair can each look different against the tile.
Cleaning Materials
A vacuum with a narrow nozzle removes dry debris without driving grit against the cavity edge. Use an acid-free pH-neutral stone cleaner, a soft toothbrush, clean water and lint-free cloths to prepare the area without leaving residue or risking etching. Broader maintenance principles are explained in our travertine floor cleaning tips, including why routine cleaning products must be rinsed away fully.
Mixing and Placement Tools
A disposable mixing tray, teaspoon or narrow putty knife, protective gloves and colour-matched sanded grout provide enough control for a shallow cavity. Keep a clean sponge and several microfibre cloths nearby for the final wipe. Our low-cost travertine repair kit guide explains practical kit choices without turning a small repair into a specialist resin procedure.
Specialist Materials to Exclude
Solvent preparation with acetone, resin hardener, catalyst ratios and razor-blade trimming belong to professional resin repairs, not this method. That level of precision is best left to a specialist rather than attempted as part of a household repair. Heat-gun drying can also cause local overheating and is unnecessary when the cavity can dry naturally.
You can purchase these products online.
These links are included for convenience and show the materials used for this small repair. Sealing and wider protection are covered elsewhere, not here.

Mapei Jazmine Grout – 2Kg pack
|

Mapei Ultracare GROUT PROTECTOR
|

Microfibre Cleaning Cloths
|
How to Fill Travertine Holes Safely
If a newly filled travertine hole looks low, hollow or partly washed out after wiping, the filler has probably been disturbed before it was firm enough to resist movement. Rushing the wipe-down can pull fresh filler back out of the cavity, particularly when a wet sponge passes over the repair too soon. The method therefore keeps preparation, placement and finishing separate so the grout remains compacted whilst the surrounding tile is protected.
1. Isolate and Inspect the Repair
Do not proceed with a repair beside a moving tile, spreading crack or loose surface edge. Press gently around the opening with a fingertip and check that the surrounding stone feels firm. Stop if you find any rocking, a hollow extension or a fragment that reveals a deeper cavity when touched.
Travertine is a porous sedimentary limestone formed by mineral spring deposition. Its natural void structure and variable density mean it must be filled before honing if a consistent surface is required. This household method does not involve honing, grinding or aggressive scraping. It deals only with a small opening that can be filled without altering the tile plane.
2. Remove Loose Dirt
Dark material inside the hole must be removed before the grout goes in because trapped dust weakens filler adhesion. Vacuum the cavity first, then loosen any remaining soil with a soft toothbrush. Avoid sharp implements. They can break an otherwise sound edge and make the repair larger than it needs to be.
Stop cleaning when the cavity is visibly free from grit and no more dry particles transfer onto a white cloth. Oil-based contamination requires specialist acetone void degreasing on dry stone, together with controlled dust extraction and solvent handling. That treatment sits outside this homeowner method. Ordinary trapped soil needs only gentle cleaning.
3. Clean Without Saturating the Tile
A greasy or grey cavity needs a small amount of pH-neutral stone cleaner, not repeated soaking. Apply the diluted cleaner with the toothbrush, agitate gently and lift the dirty liquid away with a cloth. Rinse once with clean water so no cleaning residue remains around the edge.
UK hard water can leave mineral deposits as it dries, particularly in kitchen pits and recessed grout. Keep the area only lightly damp and remove the liquid straight away. Acidic limescale products must not be used because they chemically dissolve the tile surface, leaving pale, rough marks behind.
4. Allow the Cavity to Dry
If the cavity still looks darker than the surrounding tile, it contains moisture and is not ready for filling. Leave the opening exposed until its colour returns close to that of the dry floor and a clean tissue pressed into it comes away dry. For a small household repair, natural air drying is safer than using a heat gun.
Forced heat can dry the surface before moisture deeper in the cavity has escaped. It may also affect nearby sealers. Professional heat-gun drying is reserved for controlled resin work where residual moisture would prevent specialist filler adhesion. Stop if dampness persists or unexplained darkening remains after adequate drying.
5. Mix a Small Test Quantity
A runny mixture will slump into the void and leave a low centre once cured. Place a teaspoon of colour-matched sanded grout in the mixing tray, then add water a few drops at a time. Mix until it forms a thick paste that stays on the applicator without dripping.
Judge colour tinting carefully because wet grout usually looks darker than the finished repair. Compare the test mixture with the tile, but where colour matching is critical, make the final decision from a fully dried sample. Do not add resin hardener or alter a manufacturer’s catalyst ratio. Those materials belong to specialist repair compounds.
6. Allow the Grout to Slake
Freshly mixed grout can feel smooth even when some of the dry powder is not fully wetted. Leave the mixture undisturbed for the manufacturer’s stated slaking period, commonly two to five minutes for a small batch. This gives the water time to distribute through the cementitious compound.
Remix the grout without adding more water unless the product instructions specifically allow it. The correct texture feels cohesive and workable, not crumbly or glossy. Discard the batch if it stiffens sharply, separates or develops lumps that will not remix smoothly.
7. Press the First Fill into the Hole
A cavity that accepts grout easily may still contain an air pocket beneath the visible opening. Use the spoon tip or narrow putty knife to press a small amount firmly against the base and sides. Work from more than one direction so the filler contacts the sound internal surface instead of bridging across the top.
For a slightly deeper but still shallow pit, a two-stage placement gives better control. The first application packs the lower part of the cavity and creates support. The second restores the surface level. Stop immediately if the grout disappears into an unseen void or the pressure loosens the surrounding edge.

8. Add the Final Surface Fill
The first application should support the finishing layer without leaving a hollow centre. Add a slight excess of filler and compress it across the cavity from opposing directions. This small allowance compensates for minor shrinkage as moisture leaves during curing.
Before wiping, the finished surface should sit fractionally proud rather than visibly below the tile face. Remove obvious excess with the edge of the spoon, not fine-grit sandpaper or a razor blade. Specialist resin repairs use gel-stage trimming during a narrow curing window. Grout, by contrast, should be shaped whilst it remains workable.
9. Smooth Without Grinding
A sharp ridge around the repair can collect soil and feel uncomfortable underfoot. Draw the clean applicator lightly across the opening so the grout follows the existing surface plane. Avoid polishing equipment, abrasive paper and heavy pressure. The aim is a local fill, not surface refinement.
Honed and filled travertine has a smooth, consistent satin surface. Unfilled or tumbled travertine retains visible voids. These may be filled or left open, but even when enhanced, the voids remain visually matt against the surrounding stone. Match the repair to the existing texture rather than trying to force a gloss.
10. Remove Surface Haze Carefully
A wet sponge can wash cement out of the cavity and leave the repair below the tile face. Wait until the grout resists a light fingertip touch, then wipe the surrounding tile with a clean microfibre cloth. Use a lightly damp sponge only when dry wiping will not remove the surface haze.
Removing haze is not the same as washing the joint. One controlled pass lifts residue from the tile, whilst repeated wet passes soften the fill and drag particles from the opening. Rinse the sponge away from the repair, wring it out firmly and stop once the surrounding surface is clean.
11. Leave the Repair to Cure
A repair that looks firm after wiping can still be damaged by foot traffic or pressure from furniture. Protect the area for the grout manufacturer’s stated curing time and leave it undisturbed overnight as a minimum. Do not cover it with plastic. Normal evaporation helps the water leave evenly.
Once cured, the fill should remain solid under pressure and should not leave powder on a dry cloth. A fresh repair may stay darker than the surrounding tile for some time, so delay judging the colour until it has dried completely. Vacuum away loose dust rather than wet-mopping immediately.
12. Resume Suitable Maintenance
A completed repair stays cleaner when grit is removed before wet mopping and cleaning solution is not allowed to dry in nearby pits. Use an acid-free pH-neutral product, a well-wrung microfibre mop and clean rinse water. Avoid domestic steam mops because heat and damp pads can weaken surface protection whilst redistributing soil into open cavities.
Correct ongoing maintenance is the single most important factor in extending the floor’s useful life. Where the floor needs more than routine care, our guide to safe travertine cleaning without steam covers restoration and sealing as separate services from this local repair method.
A small household kit can hold labelled grout, a clean mixing spoon, gloves and separate cloths for future holes. Store the powder somewhere dry and record the mixing quantity that produced the closest match. Floors with widespread wear or contaminated pits may instead need the controlled cleaning approach described in our travertine floor cleaning assessment guide.
What a Successful Repair Looks Like
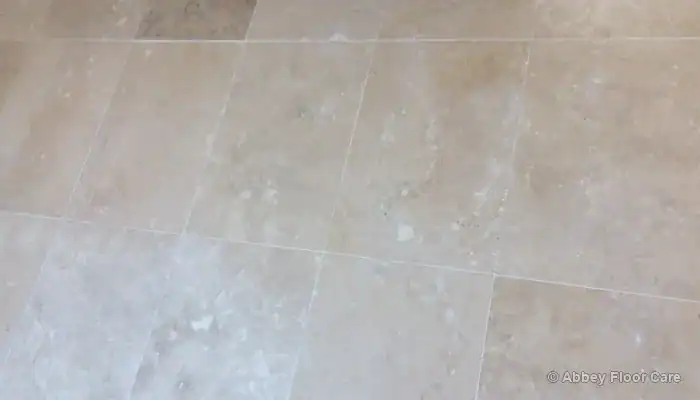
A cured repair should feel firm beneath a fingertip and sit close to the tile surface without a sharp lip, loose edge or hollow centre. The cavity should no longer collect loose dirt. But a colour-matched grout repair is expected to blend reasonably well, not disappear completely.
Acceptable level: the fill sits flush or fractionally below the surrounding plane and does not catch a cloth during cleaning. A deep depression, raised ridge or crumbling edge is concerning because it suggests the cavity was under-filled, overworked or disturbed before curing.
Acceptable firmness: light fingertip pressure leaves the repair unchanged and a dry cloth lifts no powder. Movement, a hollow centre or loose grains point to incomplete compaction, excess water or poor contact with the cleaned cavity.
An acceptable colour follows the general beige, cream or grey tone of the tile without trying to reproduce its exact pattern. Colour judgement made whilst the grout is still damp can be misleading because fresh filler often appears darker until it has dried fully.
During maintenance, the repaired pit should release dust when vacuumed and should no longer form a persistent dark spot. If it blackens quickly, the cause may be a low fill or contamination around the repair rather than a colour mismatch.
A well-executed local repair can make the floor look significantly better, often restoring a cleaner and more continuous appearance than the failed factory fill it replaces. Keep the labelled grout and clean tools together for occasional future holes, but discard cloths or sponges containing hardened residue.
When the Damage Needs More Than Filling
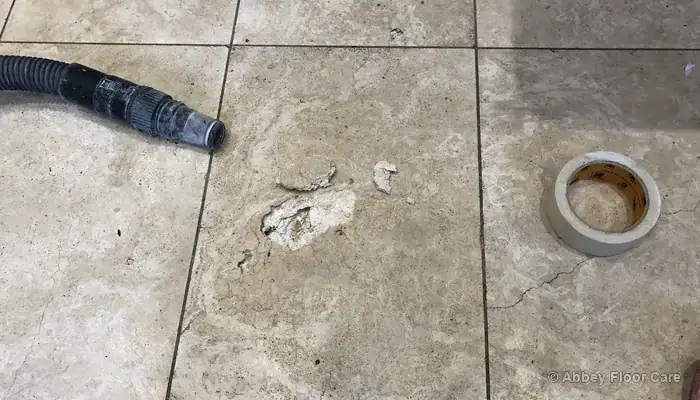
A hole that reopens, feels hollow beyond its visible edge or sits beside a tile that moves underfoot points to damage that a surface fill alone will not stabilise. Large cavities, long cracks, unstable edges and uneven tiles need a broader diagnosis before any repair compound is chosen.
Recurring filler loss can come from weakened legacy factory material or movement beneath the tile. Repeatedly covering the opening may hide the symptom whilst leaving the cause untouched. Professional work may involve removing unstable material, controlled cavity stabilisation, surface refinement or assessing the tile itself rather than applying another shallow grout fill.
Specialist polyester or epoxy repairs also need a dry substrate, accurate colour matching and controlled curing. In my experience, these procedures are best carried out professionally and should not be treated as extensions of the DIY method.
Local filling suits firm, isolated pits. Movement-related damage needs a wider repair plan. The travertine care, repair and restoration hub explains how cleaning, filler failure, surface wear and structural concerns are separated before intervention.

David Allen — Abbey Floor Care
David Allen has more than 30 years of experience with Abbey Floor Care, diagnosing and repairing travertine floors throughout the UK. His work includes the controlled cleaning, colour matching and cementitious filling process covered in this method guide, together with identifying when recurring holes require professional stabilisation rather than another surface repair.
Recent Posts:
We work throughout the country, just some of our work counties:
Copyright © 2026 Abbey Floor Care. Tile And Natural Stone Cleaning Consultants FAQ - Privacy Policy - Terms And Conditions
Abbey Floor Care is a participant in the Amazon Services LLC Associates Programme, an affiliate advertising programme designed to provide a means for websites to earn advertising fees by linking to Amazon.co.uk. As an Amazon Associate, we earn from qualifying purchases.