Sandstone Cleaning Codicote Hitchin
Last Updated on December 10, 2025 by David
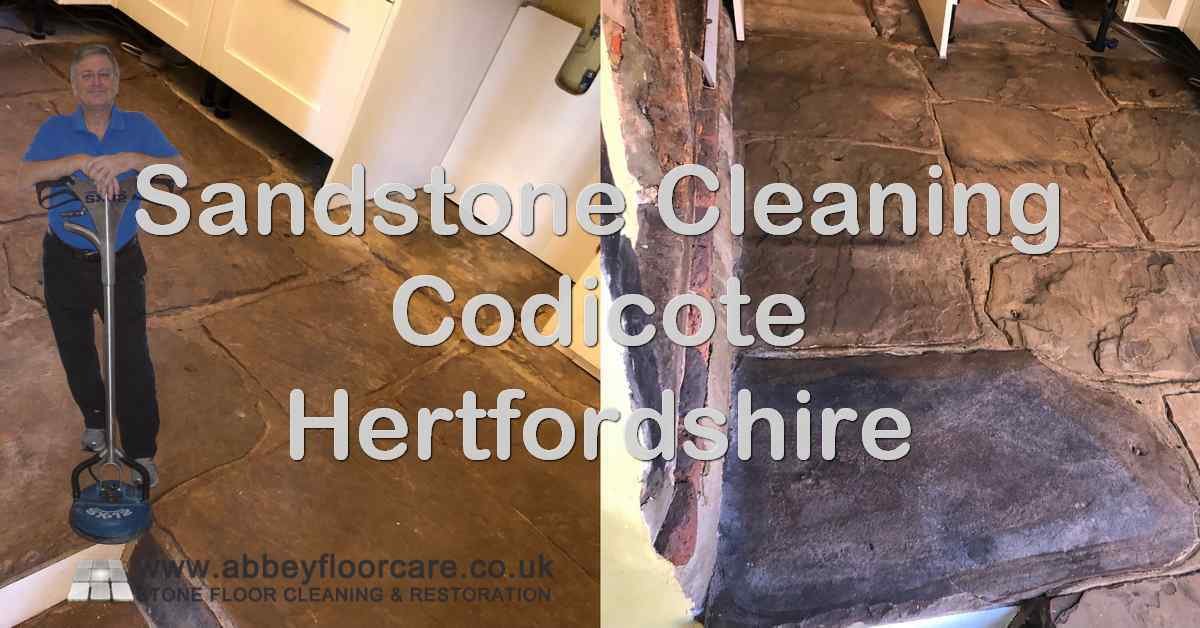
Sandstone Cleaning Codicote – Professional Deep Restoration Case Study
Key Takeaways from This Sandstone Cleaning Project
- The sandstone floor was heavily soiled and looked permanently dirty due to a worn sealer and deep riven surface texture.
- A specialist deep cleaning process removed ingrained dirt that regular mopping could not reach.
- Careful neutralisation and rinsing prepared the stone for long-lasting sealing performance.
- A breathable impregnating sealer restored a clean, natural matte finish ideal for older properties in Codicote and Hitchin.
- The floor will now stay cleaner for longer and is far easier to maintain with simple pH-neutral cleaning and routine care.
Pro Tip: We recommend these products for daily Travertine maintenance cleaning.

Fila Pro Floor Cleaner
|

LTP MPG Sealer H20
|

Vileda H2PrO Spin Mop System
|
This sandstone cleaning project in Codicote, near Hitchin, began when a homeowner became increasingly frustrated that her kitchen and hallway stone floor always looked dirty, no matter how often she scrubbed it. The surface had become heavily soiled, uneven in colour, and impossible to keep hygienic. Like many riven and textured sandstone floors, the pores and ridges were trapping soil deep within the stone, and without a functioning sealer, the floor was absorbing dirt far faster than regular cleaning could remove it.
Sandstone is naturally porous and, in older homes around Codicote and Hitchin, it is often laid without a modern damp-proof membrane. This means moisture can travel upward through the stone, carrying fine particles that settle on the surface. Over time, this creates a grimy, patchy appearance that homeowners struggle to resolve with household products. When I first inspected this floor, it was clear that a thorough deep cleaning and restoration were needed to remove ingrained soil and restore the stone’s natural colour.
The homeowner’s main goal was simple: a cleaner-looking, healthier, more welcoming floor that would stay cleaner for longer without daily scrubbing. To achieve that, the first step was a thorough survey to understand the condition of the stone and identify the best restoration approach.
What the Homeowner Was Struggling With (Codicote, Hitchin)
During my initial visit to the property in Codicote, it was immediately clear why the homeowner felt defeated by this floor. The sandstone in both the kitchen and the hallway had become heavily ingrained with soil, particularly in the textured, riven areas where dirt naturally collects. Despite regular mopping, the floor never looked properly clean, and the uneven surface made day-to-day maintenance almost impossible.
This is a common situation with sandstone floors across Hitchin and the surrounding villages. Once the original sealer wears away, the stone becomes highly absorbent. Soil, spills and moisture soak into the pores, leading to dark patches, uneven colour and a dull appearance that can make a home feel less hygienic than it really is.
The homeowner had also tried several DIY cleaning products, including standard detergents and “deep cleaning” sprays. Unfortunately, these products often have little impact on textured sandstone and can sometimes contribute to further soiling by leaving residues behind. Steam cleaning, which many people try as a last resort, can also draw moisture deeper into the stone and accelerate deterioration.
In this case, the floor’s dull, dirty appearance wasn’t caused by poor housekeeping—it was a natural consequence of sandstone’s porosity and the lack of a functioning protective sealer. Without professional deep cleaning and re-sealing, no amount of mopping would have restored the natural colour or prevented rapid re-soiling.
Initial Survey – Understanding the Condition of the Sandstone
Before any cleaning work begins, the most crucial stage is always a detailed survey. Sandstone varies widely in porosity, texture and hardness, and older floors in Codicote and Hitchin are often laid without a modern damp-proof membrane. This means moisture can naturally move through the stone, affecting both the surface appearance and the performance of any sealer applied later.
In this home, the sandstone tiles were heavily textured with a naturally riven finish. This type of surface is excellent for character but notorious for trapping soil. The pores were filled with compacted dirt, and the textured ridges had collected years of acceptable debris that standard cleaning couldn’t remove. There was also no sign of a functioning sealer, which meant the stone was absorbing liquids immediately—one of the main reasons the floor looked patchy and dull.
- Surface texture: Deep riven areas holding compacted soil.
- Porosity: Stone absorbs water rapidly, indicating the absence of an active sealer.
- Moisture movement: Consistent with older installations without a DPM.
- Previous treatments: No evidence of coatings, but signs of frequent DIY cleaning attempts.
Understanding these factors allowed me to select the correct cleaning chemistry and mechanical tools. The homeowner appreciated a clear explanation of how sandstone behaves and why a deep restoration was the only effective way to remove the ingrained dirt without risking damage.
Preparing the Codicote Kitchen & Hallway for Restoration
On the agreed start date, the homeowner had already cleared smaller items from the kitchen and hallway, which made it easier to begin immediately. Good preparation is essential when working on textured sandstone, because loose grit and debris can interfere with the cleaning process and act like abrasive particles on the stone surface.
My first step was a thorough dry sweep and vacuum of the entire area. This removes dry soils before any wet cleaning begins. Sandstone with a riven or uneven finish tends to trap grit in its ridges, so careful vacuuming helps protect the stone during machine work.
With the loose debris removed, I masked off adjacent areas and prepared the cleaning equipment. A deep clean on sandstone requires the right combination of chemistry and mechanical agitation. The goal at this stage is to break down and lift the compacted soil from the stone’s texture without over-wetting the floor or pushing dirt deeper into the pores.
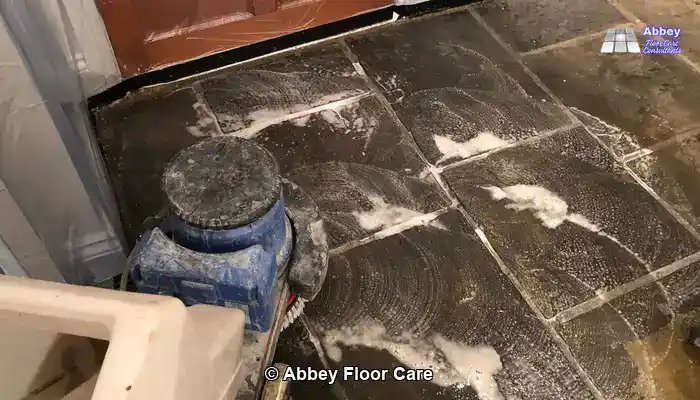
Deep Cleaning the Sandstone to Remove Ingrained Soil
With the preparation complete, I applied a carefully mixed alkaline sandstone cleaner across the floor. This type of product is designed to break down oils, soil and residues without damaging the stone. Because sandstone is highly porous, especially once unsealed, I allowed the cleaner to soak in for around ten minutes. This dwell time is essential for loosening compacted dirt trapped deep in the pores and textured areas.
Once the cleaner had worked into the surface, I began mechanical agitation using a rotary scrubbing machine fitted with a medium-duty brush. Riven and textured sandstone needs this level of agitation to lift soil from the ridges and natural clefts. As the stone released its soil, the slurry quickly darkened, a clear sign of deep contamination being removed.
The dirty slurry was extracted using a heavy-duty wet vacuum. After the initial pass, I rinsed the floor with clean water and vacuumed again to remove residues. On heavily soiled floors like this one, it is normal to repeat the process several times until the water runs clear and the stone’s natural colour begins to reappear.

The sandstone floor before cleaning: deep, compacted soil trapped in the riven texture.
Restoring the Natural Colour and Clean Appearance
As the ingrained soil lifted from the sandstone, the stone’s original tones began to re-emerge. Textured sandstone can look deceptively dull when covered by years of compacted dirt. After deep cleaning, the floor immediately looked brighter and more balanced.
A final neutral rinse prepared the stone for sealing by removing any remaining alkaline residues. Neutralisation is vital because it prevents chemical residues left on the stone from interfering with sealer performance.

The sandstone after deep cleaning: natural tones restored and ingrained soil removed.
Sealing the Sandstone with a Breathable Impregnator
Once the sandstone was thoroughly cleaned and neutralised, the final stage was to protect the surface with a breathable impregnating sealer. Older homes in Codicote and Hitchin often lack a damp-proof membrane, allowing moisture to move through the stone naturally. A breathable sealer allows vapour to escape while blocking dirt and spills from penetrating the pores.
The homeowner preferred a natural, matte finish that would preserve the sandstone’s authenticity. A high-quality impregnator was applied in controlled coats, allowing it to soak deeply into the stone and provide long-lasting protection.

Applying a breathable impregnating sealer to protect the sandstone while maintaining a natural finish.
The transformation was immediate. The floor looked cleaner, fresher and more even in colour, yet still completely natural—precisely what the homeowner wanted.
Results – A Cleaner, Brighter, More Hygienic Sandstone Floor
By the end of the restoration, the sandstone floor looked dramatically improved. The deep-set dirt had been completely removed, revealing the colour variations and character that had been hidden for years. The homeowner commented that the floor now felt fresh and hygienic, particularly in the kitchen.
“It was a real pleasure to have you here, thank you so much for doing a fantastic job!”— Daniel D.
With the pores protected by a breathable impregnator, the stone will stay cleaner for longer and respond far better to routine cleaning. This is especially valuable for textured sandstone, which can otherwise become difficult to maintain.
Sandstone Maintenance Advice
After restoration, sandstone becomes much easier to care for, but simple steps will help preserve the finish for years:
- Use a pH-neutral cleaner: Avoid bleach, acidic products and washing-up liquid.
- Vacuum or sweep regularly: Grit and debris can cause abrasion.
- Avoid steam cleaners: Steam can weaken sealers and introduce moisture into the stone.
- Wipe spills quickly: Even sealed stone benefits from prompt care.
- Re-seal every 2–3 years: High-traffic areas may need attention sooner.
If you have a sandstone floor in Codicote, Hitchin or the surrounding area and would like guidance or help with cleaning or maintenance, please
get in touch. I’m always happy to offer advice or arrange an inspection.
Frequently Asked Questions About Sandstone Cleaning in Codicote & Hitchin
1. Why does my sandstone floor always look dirty even after mopping?
Sandstone is naturally porous and often textured, which means soil and cleaning residues settle deep into the surface. Once the original sealer wears away, everyday mopping only cleans the top layer while dirt remains trapped below.
2. Will deep cleaning damage my sandstone?
No. When carried out professionally, deep cleaning is completely safe. The correct combination of alkaline cleaners, mechanical agitation and controlled rinsing removes ingrained soil without harming the stone.
3. Do I need to reseal my sandstone after cleaning?
Yes. Without a breathable impregnating sealer, the stone will quickly absorb dirt and liquids again. Sealing helps maintain a cleaner appearance for longer and makes routine maintenance much easier.
4. How long does sandstone sealing last?
Most internal sandstone floors require resealing every 2–3 years, depending on traffic and the frequency of moisture contact. High-use areas may need attention sooner.
5. Can I use a steam cleaner on my sandstone floor?
It’s best to avoid steam cleaners. Steam can push moisture deep into the stone, weaken the sealer and create patchy whitening or surface deterioration. A pH-neutral cleaner and regular vacuuming are safer options.
6. What’s the difference between a breathable sealer and a topical coating?
A breathable impregnator soaks into the stone and allows moisture to escape naturally—ideal for older properties without a damp-proof membrane. A topical coating sits on the surface and can peel, flake or trap moisture, so it’s rarely suitable for sandstone.
7. How do I know if my floor needs professional cleaning?
If your sandstone still looks patchy or dirty after regular cleaning, or if dark areas reappear quickly, it’s likely the pores are holding ingrained dirt. A professional assessment will determine whether cleaning, resealing or deeper treatment is needed.
Recent Posts:
We work throughout the country, just some of our work counties:
Copyright © 2025 Abbey Floor Care. Tile And Natural Stone Cleaning Consultants FAQ - Privacy Policy - Terms And Conditions
Abbey Floor Care is a participant in the Amazon Services LLC Associates Programme, an affiliate advertising programme designed to provide a means for websites to earn advertising fees by linking to Amazon.co.uk. As an Amazon Associate, we earn from qualifying purchases.